Showing posts with label insul-bright. Show all posts

Saturday, April 23, 2011

Insulated Reversible Coffee Cozy Tutorial and GIVEAWAY!!!!!

Okay, so I understand it is the day after Earth Day, but that doesn't mean the planet stops rolling!  Today's Earth-Friendly project: Insulated reversible coffee cozies!  And a giveaway!  (After the tutorial).

But first, let me take a serious moment to encourage you ALL to rent, borrow, or netflix the movie "Food Inc."  If you care for the environment, and you care about yourselves, it will be worth your time to see what's in your food, and what it is doing to your body!

Now, on to the tutorial!
You will need:  a starbucks coffee sleeve, a front fabric, a reverse fabric, some insul-bright, and some velcro!

Take your starbucks coffee wrap, and open it up.  I laid it out on some paper, and then gave an extra half inch around all sides for seam allowances and bulk.
Then I cut one each of front fabric and reverse fabric.  I cut one piece of insul-bright to match the original starbucks wrap.
With right sides together, stitch up one side, across the end, and down the other side.  I used 1/4" seam allowances.
 Now, take some scissors, and cut the corners at a 45 degree angle, like this:
Why cut the corners?  It helps you get crisper corners when you turn it inside out.  So, as you might have guessed, now you will need to turn it inside out.  Now, I have learned this cool trick over time to help you get really crisp corners.  You know when you go to get a pedicure and they use that wooden stick to push your cuticles back?  Well, instead of letting them throw it away, ask to take it home this time!  I have found it is extremely useful in getting crisp corners.  (You might want to wash it first, though).  They sell "corner turners" at the craft store that look just like these, but I like the free version better.  Check it out below:  I used my finger for the corner on the right, and the pointy stick for the corner on the left.
Now, slide your insul-bright into the pocket!
Now, take the open end and fold the ends under, ironing to help them stay put.  Then take the fuzzy side of the velcro, lay it on the edge, and stitch it down.  This way you get two birds with one stone; you finish the edge, and you sew on the velcro at the same time.  Then flip the cozy over, and sew velcro on the other side!


Then fold it together and Ta-Da!  You have a coffee cozy that you can change based on your mood!  A sampling of my different varieties:


These are a quick, easy, and green gift to make, especially if you use scraps to make them!  Enjoy!


And the Krafting with K Earth Day GIVEAWAY!!!  We will be giving away a Reusable shopping bag and one of today's coffee cozies to help encourage you, our readers, to reduce waste!  I will also throw in some Bath Sea Salts and a Bath Bomb Fizzy for fun!  Winner will be chosen via Random.org.  How do you enter?

*****Become a follower of Krafting with K (and leave a comment letting us know you did)****

Additional entries:
1-Leave us a comment letting us know what you did or are going to do to help the planet this month!
2-Leave us a link to a Earth-day friendly project of your own!

That's it!  Giveaway will start today and the winner will be drawn Wednesday at 9pm.  Good luck everyone!  I can't wait to see what "green" things you are up to!


Friday, April 22, 2011

What's Cookin'?

Have you ever made a hot dish or casserole for a potluck party or picnic, but just didn't know how to get it there without a) burning yourself, b) spilling it everywhere, c) letting it get cold, or d) all of the above? I have just the solution! Here is yet another trendy way to carry your dish to a party without all of the aforementioned mishaps.

This is yet another amazing design from One Yard Wonders. Have I mentioned how awesome this book is? I was also inspired by MissK's very own casserole carrier. I wanted one, too!

The construction is fairly simple. Just get yourself one yard of cute fabric, a yard of Insul-Bright or similar product, a package of 1/2 inch and 7/8 inch bias tape, and drawstring, and you're ready to go!

You cut 4 big circles- 17 inches in diameter- from the cute fabric. That's 8.5 inches in radius. The way I did it (because I didn't own a plate that large- thank goodness!) was to pin my soft tape measure in the center of the 'circle', then use a disappearing fabric marker to eke out little dashed lines in a circle where I wanted it. I cut out two, then used one as a template for everything else (easy!). You cut 2 circles out of the insulation, then 2 handles from insulation and 4 from the cute fabric.
Then you basically make an insulated sandwich, using the cute fabric as the 'bread' and the insulated fabric as the 'filling' (can you tell I'm hungry? I'm starting to want Oreos!). You baste all of this together. Then you take the top piece and cut a 6-inch diameter hole in it. Cut the doughnut in half and baste the raw edges.

Next comes the bias tape. Use the skinny stuff on the straight edges, and the big stuff on everything curvy. Be sure to leave space in the inner doughnut hole to thread your drawstring through. Make sure you've trimmed your handles before this- otherwise it'll look weird.

In the book, it says to 'turn the tape to the wrong side and press'. I was a little confused by that- basically, it means that at the ends where you want the drawstring to go through, you don't want any raw edges, so turn the tape back on itself to make a nice neat end. I'm not sure if I folded it correctly, though, because I still ended up having to trim off some of the tape that was sticking out. Other 'goofs' included me having a hard time bending the bias tape to fit the edges- it kept bunching up on me under the needle. I eventually got frustrated and just let the sewing machine have its way, but if anyone has suggestions for me, I would appreciate them!
Whoops- looks crinkled now.
Also, what do you think about the fabric? I originally thought 'party!' when I saw it...but once I put the whole thing together, I was worried that it might be too loud or garish. Thoughts? Opinions?

Pretty or woah?
PS: This thing is HUGE...I fit my casserole dish in here with a lot of room to spare. 

Thursday, April 21, 2011

MAN CRAFTS: Reversible Brewing Mitt Tutorial

First, let me remind you to stop by again, Saturday, the day after EARTH DAY, for an important message and GIVEAWAY!!!

My husband brews beer.  He just finished his third batch, and he is loving it.  But, he keeps spilling beer on our oven mitts.  Sewing machine to the rescue!!!
The boys brewing beer.  With the kitchen mitts.  The one in the flannel is mine (boy, not mitt).
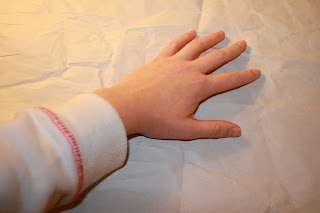
First step: Make the Pattern.  This one is easy.  Trace a mitten pattern around your hand. 
 Then, draw around it in the shape of an oven mitt, remembering to leave room for seam allowances and the bulk of your batting/insul-bright.
 I used a pre-quilted cotton blend for one side of the mitt, and some regular cotton print for the other side.  I also cut a smaller version of the mitt in insul-bright.  Remember; cut two of each fabric.
 I then sewed the quilted fabric and the cotton, right sides together.  I sewed up one side of the mitt, around and down the other side.  I left the bottom open.  This is very important.  If you sew all the way around, you won't be able to turn it right-side out, and basically you will have a craft fail.
Here's where I started spacing out on taking pictures, but I will try to explain.  So I turned both right-side out and ironed the seams out.  But then, I turned the cotton fabric back wrong side out and stuffed it inside the quilted mitt, so that there would be a mitt inside the mitt, with the wrong sides facing each other.  then, on each side of the mitt, slide in your insul-bright!  And the bottom of your mitt will look like this:

Of course, you do not want your finished product looking like this.  So what do you do?  You grab my favorite thing: bias tape!  Wrap it around the bottom, topstitch, and voila!  You are done.  This project took half an hour, tops, and is a wonderful solution for the beer-soaked potholder situation.


Wednesday, March 16, 2011

Kiss the Cook Apron

When the weather is nice (apparently not today) my husband grills outside. I love summer because there are less dishes to clean up when he grills and grilled food is often healthier than winter food. So in honor of the spring and summer, I decided to make my husband a manly grillin' apron.


I bought a Simplicity pattern to help me with the basics. I bought Simplicity 5154. I made some changes to the pattern because I wanted something a little different.
  1. When I cut the pattern, I made it 6" longer so it would cover my hubby's legs
  2. Instead of making the ties out of fabric, I took the easy way out. I bought belting! Cheaper and much easier
  3. The belting I put around the neck, I made it about 1" longer, since my hubby likes everything loose
  4. Finally, I had leftover insul-bright. Why waste it? I made the two pockets lined with insul-bright. Great for keeping beer cold and in a pinch they can be used as pot holders!

    So I finished the apron around 2pm and decided to see if the beer would fit in the pocket. My husband came home at 6 and the beer was still cold! I'm thrilled with the results. More apron madness is on its way from Mrs S.

    Monday, March 14, 2011

    Finally Finished: Casserole Carrier

    Bell are ringing

    Bird are chirping

    The alleluia is at full blast

    I'm happy to announce that I am finally finished with my most recent project. It's a casserole carrier. We go to a few cookouts in the winter months and numerous ones in the summer. I saw this and was inspired to make one for myself.

    Here's the final product. Isn't it pretty?
    The fabric is from JoAnn Fabric and I used Insul-Bright as instructed. During all of the sewing I noticed I didn't have flannel to make the straps thick. I had extra fleece from my love blanket so I used that instead. She says to double up the flannel but I just used single fleece.

    I also made mine slightly different since I wanted long pieces to wrap around. I ended up using a lot of velcro. It makes a nice sturdy seal so no heat will be escaping.


    I did end up spending lots of time with my seam ripper. I had to rip our the top stitching because I ran out of thread. Then more seam ripping because I put on the one handles wrong. I accidentally ripped out the correct handle so then I had to put that back on. OMG, so much seam ripping. I thought I would never finish.


    Anyone who is new to sewing, I tell them to just start sewing. If you mess up, just tear it out! Anyway, I live by that when I sew. I do try to minimize the ripping, but it usually doesn't ruin your project if you sew something wrong. Just rip it out and try again.


    The result of all the ripping and sewing is this beauty. I honestly want to make another since I now have the hang of it. It would make a great bridal shower gift!!

    Linking to:


    Photobucket