Friday, October 25, 2013

Halloween Banner

Hi there!  I'm new contributer here at Kraftin with K.  Ms K, my husband's friend from college, and I recently found out that we share a passion for krafting.  I lost my kraft gene for a few years, but its back and better than ever.  It has been so much fun "krafting with [Ms] K", and now here I am as a guest blogger on her site.

So, it has been awfully quiet around here.  I hope the project I'm about to share sparks your interest.  I think I am actually going to enter it into The Twinery Theme Challenge #0013, since it just so happens to use twine.  You can find out more about the challenge by clicking here.


My inspiration for the project was brought on by the fact that I have very few Halloween decorations.  I felt like my mantel really needed something Halloween-y, so I got out my Silhouette Cameo and decided to make a Halloween banner.  I think it adds just enough of a Halloween theme.  The shape I used was a free shape of the week, the be mine and love banner, a while back for Valentine's Day.  I just changed the banner to say "Happy Halloween."  The Silhouette shape, if you don't already have it,  can be found here.   The banner is hanging by the Twinery's Charcoal (Black) Stripe Twine.

Without further ado, here are the pictures.  What do you think?

Full shot


Detail Shots - See the twine?


Hope to be back soon with other krafty projects!

Monday, October 8, 2012

Thank You Cards

I've been crafting up a storm but I've been really bad about posting pictures, tutorials and just general updates. Things have been nuts around here. I've been back to work and with a full 40+ hour work week, I have just enough time to sneek in crafting on the weekends and on some week nights. I work 40 minutes from our house so when I get home it's usually 7pm and time to eat and hunker down for the evening.

In other "busy" news, my tumor came back so when I'm not working or crafting, I'm resting from chemo treatments. Yuck. I'm having a fund raiser later this month for the Desmoid Tumor Research Foundation. For people who donate, I'm giving them one of these snazzy thank you cards.

Here's the round-up of the completed cards. This has a scalloped design at the bottom - lots of pink love!

This one is a knock-off of another card I saw on pinterest. I can't find the link right now

This is also a pinterest card re-made. I love the conversation bubbles.

Here's the green/blue and purple/pink cards side by side

And the pink one by itself
This is the only one I made without using my Silhouette. The purple flowers are punches
I bought the "Thank You" stamp for $1 almost a year ago. The colored cards were all from Michael's but I think they stopped carrying them around here. I made 20 Thank You cards so the variety really helps keep me interested. Plus I want each one to be unique. While some are in the same family, there's not a single duplicate. What do you think? Do you have any cards you've pinned that you've made recently?

Sunday, July 29, 2012

Crafting weekend fun

Wow. I haven't really crafted in a while!

To be fair, I started a Master's degree and a job, so I've been really, really busy. The last thing I made was a christening outfit for my nephew in April. I started working on a yellow dress, but the fabric is very thin and I needed to get stabilizer so that I could sew it correctly without it bunching up. Oh yeah, and I got a new sewing machine! It's a Brother electronic machine. I wasn't sure if I was going to like it, but the more I use it, the more I like it.

So here are some things I've made over the past few weekends. I needed to take a mental break from school work!

I made a great teacher binder out of an old binder and some pretty yellow fabric. The best thing about it is that it's refillable because I made all the pages in Excel. I simply laid out the binder open on a piece of fabric and cut it so it was about an inch larger than the binder on all sides. Then I fired up my hot glue gun and started making lines back and forth across the cover. I pressed the fabric on, then moved to the spine and the back. I then laid the binder open and folded over the flaps, gluing as I went. The glue cooled pretty fast! I cut some scrapbook paper to size and then hot glued that into the interior. I made a word cloud on Wordle about teaching science for the front picture.

Did I mention this binder is red underneath? Can't tell, can you?


I've been wanting to make one of these for a while, so I followed the tutorial on Crafting with Orange. I like the idea of making gift bags out of something recyclable and earth-friendly. The gift tag is from an old greeting card someone sent me. If it's a sentimental card, I scan it or take a photo of it, then cut the front picture up for gift tags.


I've also gone on a plastic-free kick after reading Life Without Plastic. I've never really been comfortable eating from or drinking from plastic things, so this has been a feel-good move on my part. It's been a lot harder to implement, though, because EVERYTHING comes in plastic at the grocery store. Mostly convenience items, but really...anyhow, I found this cute soap pouch tutorial on WhiMSy love and decided to give it a shot. I used a boring old washcloth for mine, but it worked out great! I can't wait to give it a try and get rid of my old nylon scrubbing thing. The nice thing about it is that it can go through the wash after I'm done with the bar of soap, and be reused again and again. I'm thinking about adding a rope to hang it up with.
Soap pouch! The flaps overlap so the soap stays inside.


That's all I've made so far, but it's more than I've done in a long while. My next project is going to be flannel 'tissues'. We'll use them once, then throw them in the wash and use them again. Hankies, basically!

Have a great day!

Wednesday, April 25, 2012

DIY Linen Invitation Tutorial

So, our baby's baptism is coming up, and we are super excited about it.  It is a great opportunity to get the family together, and also help start our baby out on the right foot spiritually.

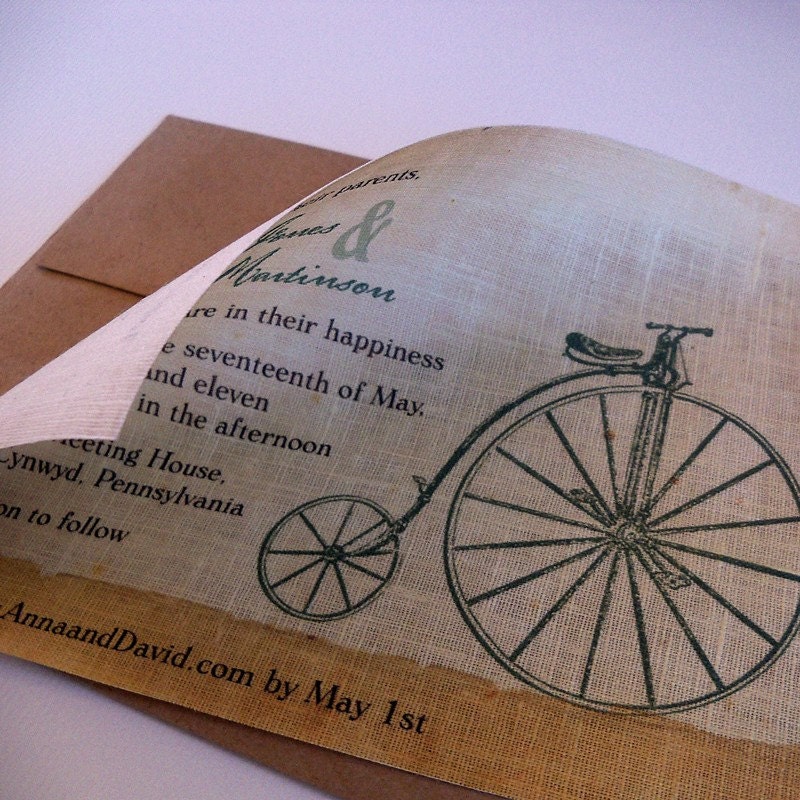
Since this is such an important event for us, we wanted to do something really awesome with the invitations.  I saw this idea on Etsy, but couldn't bear to spend the money on it:

So, my husband and I decided to make our own!  He found this great tutorial at the Offbeat Bride blog, and we modified it to fit our needs.  

Instead of cutting the fabric into 8x11 sheets and then affixing the freezer paper, we simply cut one long 11" strip of fabric and starched it....

...then ironed the freezer paper straight onto it, and THEN we cut into printer-sized sheets for the invitations.

Then we just threw the sheets in the printer and ta-da!


We cut the invitations to fit the cards, and fray-checked the edges.


We used a special punch to edge the cards.


And the final product--invites fit for a king!


Saturday, April 21, 2012

MAN CRAFT: Hand washing machine tutorial

Well, with a baby on the horizon, we have to think about diapers.  We are cloth diapering, which means lots and lots of laundry.  However, our current living situation calls for coin-op laundry machines.  Ew to spending money.

So we looked at hand crank machines such as the Wonder Wash, but we weren't totally excited to cough up 50-60 bucks for one.  So my genius husband went to Lowe's and figured it out for himself!


So now, I am going to attempt to explain what he did.
 Supplies:
5 gallon Bucket
Drill
Paint stirry thing aka mortar mixer
PVC pipe
various PVC connectors

First, he drilled a hole in the bucket to fit the mortar mixer.

 Then he used E6000 glue to affix a PVC endcap to the bottom of the bucket.  This helps keep the stirry thing off the bottom, which allows for more agitation and keeps the mortar mixer in place.

The next few pictures show how he used the PVC bits to make a handle for the mortar mixer.  He used E6000 glue to attach it all together.


For ease of stirring, he put some bigger PVC pieces around the handle.  

Now, how do you use it?  We tested this device on some pretty gnarly stains, and found the best method is 1 wash with 2 or 3 rinses.  Agitation is best done by turning the handle back and forth 180 degrees for about 5 minutes.  Yes, it is a workout, but it will save us a TON in quarters!


Friday, March 23, 2012

Date Night!

Last week, I did a St. Patty's themed date night for my husband and I.  I got the idea from this Dating Divas post.  While it is specific to a holiday, I would suggest doing it any old time!

Basically, I made up a scavenger hunt.  At each location, I had a little dollar-store item and a clue to the next location.  At the very end, I had a bowl full of my hubbie's favorite candy and a list of 10 reasons I was lucky to have him!  Here is a picture of everything--I did a "taste the rainbow/Irish" theme.
I had plastic mugs, skittles, a cookie, glow sticks (for the bathtub!), glow sand, Gangs of New York (okay okay Irish-American, but close enough), Peppermint Patties, and of course the printable from the Dating Divas.  I also scoured the web for St. Patty's printables and found one with really corny jokes.  I wrote the clues on the back of them.  I also cooked the hubster a yummy Pirate Pasta dish for dinner, and we ate it outside (we've been having some crazy warm weather here in the midwest)!

It took forever to set up the scavenger hunt, but my husband got so excited for all the clues. This is definitely something I would do again!

And if you are looking for some AWESOME date night and marriage fun ideas, check out the Dating Divas--I just found this blog, and I am so excited to try all of their ideas!

Thursday, January 19, 2012

Easy car trash bags!

So, I found this great tutorial on the Make it/Love it blog for how to make a car trash bag.  I loved the boning idea, and then just made things up on my own, because I am bad at following directions.

I made my bag fully lined, so it adds a couple extra steps.  If you do not want to line your bag, then start out by making it like I made my gift bags, and hop back here to insert the boning.

First, I cut two large rectangles of fabric and placed them right sides together, stitching up and around the whole outside, leaving a small opening to pull the fabric through.  Then, I turned it out and topstitched, so there would be no raw edges on the final product.


Then I folded the project in half and stitched all the way up two sides.

 Next, I folded down the top about an inch or so.  Then I topstitched to make the casing, all the way around, leaving an opening of about 2-3 inches, so I could insert the boning.
 Then I inserted the boning all the way around the casing.

Once I had the boning in, I cut it to fit and stitched it together.  Now, this is a tricky part.  You have to cut the plastic in your boning shorter than the fabric, so that you can stitch it shut.  DO NOT TRY TO STITCH THE PLASTIC.  YOU WILL BREAK YOUR NEEDLE!  You will have to wiggle the boning out of the casing a little bit, in order to get it up under the needle of your machine.  However, once you are done, you will be able to just slide the boning back in place.

 The last step is to attach a hanger.  You can use any material for this--I chose some parachute cord.  I inserted the cord up into the hole in the casing, and then topstitched it all shut.
 Then, I flipped the cord up, and topstitched it down to the top of the casing.  Again, be mindful of where the boning is--you do not want to stitch on that plastic!
 Once you have the hanger stitched on, you are ready to hang!!!
 Or, lay flat for a glamour shot.  Look how nicely the boning keeps the opening wide open!!!  This is handy when you are driving, because you can just toss stuff in!
 So, I wanted to go take pictures of this in the car, but it was too cold, so you will have to use your imagination a little bit.  The nice thing about using the string for this bag is that you can tie it up to make it shorter or longer, depending on your needs.  So, you can tie it shorter, to slip around your gear shift (or top of your rocking chair, as the case may be).
 Or, you can leave it longer, to fit around the back of your headrest, or glove compartment.  (Or lamp.)
Ta-da!  Now there is no excuse for a messy car!