Showing posts with label kitchen craft. Show all posts

Sunday, August 21, 2011

Dumpster Butcher Block Makeover!

Okay, it is not a true butcher block, but this kitchen work table is made out of solid hunks o'wood, and I can cut on it, so that screams butcher block to me.

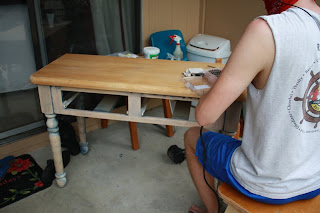
The story?  Well, we live in a college town, so everyone moves out all at the same time.  Our complex puts out a huge roll-off dumpster, and opens the side to that you can just walk in and dump your unwanted furniture (and trust me, these kids throw A LOT of perfectly good stuff away).  My husband discovered this beauty resting right on the end of the dumpster:


Wayyy too early 90's country fair for me.  However, my husband looked on the bottom and discovered that this work table was made by a local guy who charges $500-700 for a table like this.  And someone threw it away?  Yowsers!

Now, there was much work to be done.  The top of the table was very scuffed, and well, you see the paint job.  So the hubster got to work (I was mostly the creative director/supervisor on this project).  He got out some sandpaper and started sanding.  That didn't work.  So then he got out a heat gun.  That didn't work either.  So he got out a power sander.  No dice.  We eventually caved and got a soy-based earth-friendly paint remover, and then we saw some progress.  It was a week-long adventure.  Photos of the sanding extravaganza below:


So there was the sanded project.  Mr. S still couldn't get all the blue off, but I'd say he did pretty well!  So then it was time to paint and seal.  We used a food-safe sealer for the top, and some Valspar paint for the body.  We also painted the inside of the drawers with some free Glidden paint we got from a recent promotion.  The hubs said the Valspar paint was much easier to deal with and less toxic to breathe in.  We added a couple new drawer pulls, and voila!  A pretty new butcher block for the kitchen!


Tuesday, August 2, 2011

A little preview

Since you might be wondering where we've been, I wanted to give you a little preview of a couple projects we have been working on.

Dumpster freebie re-do
 (can you believe this was thrown away?--It's a $500 kitchen work table!)
Vintage French wall art (still in progress)
Getting ready to open an Etsy shop!

Saturday, February 19, 2011

Good Stinks-Bath Bomb Fizzies!

My great grandfather used to always ask for the same cologne for Christmas every year.  It made it easy for my grandpa to shop for him, plus he always smelled good.  As my grandpa used to say, he was giving him "good stinks."

Well, for group craft night last week, we did some of our own good stinks.  These were fairly quick and easy projects, but since we did so many, I am splitting this into a couple posts.  Today's post: bath bomb fizzies!


Now, as I was looking for a recipe online for this project, I discovered that everyone has a different recipe. Some people use corn starch, some people use borax, some people use stuff I can't even pronounce.  The common ingredients in all the recipes were: baking soda, citric acid, and oil.  Also, the ratio of baking soda to citric acid was always 2:1.  You should know that citric acid is very difficult to find in large quantities; most people order it online, but we eventually found some with the spices in a local co-op store. You can also find smaller quantities with the canning supplies in a few grocery stores.

So here is the recipe:
2 cups Baking Soda
1 cup Citric Acid
1/2 cup Corn Starch
5 tbsp oil (olive oil, grapeseed oil, basically any light oil)
10-12 drops scented/essential oil (I used soothing lavender)
5-10 drops vitamin E oil
Food coloring

First, you have to mix the dry ingredients together.  So, mix up the baking soda, citric acid, and corn starch.  In a separate container, mix the wet ingredients.  Now, this is where some people use borax, because the food coloring will not disperse unless you have an emulsifier (sp?).  However, we did not have borax, and the food coloring still eventually dispersed...it just came out looking more speckled.  So it is still do-able.

Now here is the fun part: mix the two together.  With your hands.  I tried a spoon, and it didn't work nearly as well, and also it was not nearly as fun.  As it mixes, it should end up with the consistency of wet sand.  So, if you pick it up and squish it, it will kind of harden, but also will crumble apart.  Now you are ready!

Some people suggest that you grease the mold with oil before packing in the mixture; it did it both with and without the greasing, and both ways worked fine.  I used a soap mold I found at hobby lobby, and an ice cream scoop.  Both of those worked fine as well.

Now, for the packing.  This is tricky, because you have to pack the mixture super tight.  Pour some in, squish it down, pour some more in, squish it down.  I used a lot of elbow grease to pack it in super tight. If you don't pack it in tight, it will end up being very crumbly.  So basically, when you think you are done packing, do it again.

Then, let it sit in the molds for AT LEAST 1/2 hour.  You may then pop the bombs out.  Let them sit and dry for 3 days.  If you fiddle with them too much before then, they will crumble and you will be sad.  However, know that even crumbled fizzies will still fizz when you put the mixture in the bath.

And ta-da!  You are done.  Below are a couple of pictures of the mass of fizzies we made for craft night (this recipe makes a big batch-perfect for gift-giving!).  Enjoy!!!!


Linking to:


Running with Glitter